Shabby Template

Wednesday, May 11, 2011

Jambalaya

My husbands family lives in New Orleans, a town quite unlike the rest of the United States. Our family has been introduced to Mardi Gras, Jazz Fest, and the wide range of food that is New Orleans. We try to visit Mike's family once or twice a year, and we always try something new. My son's favorite New Orleans food are oysters on the half shell, he has good taste! I think that by introducing kids to different culinary foods at a young age, kids will broaden their horizons and try just about anything.

Sorry there is only one picture, we were having too much fun and I forgot to get the
 camera out until we were done cooking! A taste of New Orleans.

Jambalaya

1/4 C cooking oil                                                     
1/2 lb smoked sausage, sliced                                     
1/2 lb ham                                                                   
1 C chopped onion                                                    
 1 C chopped bell pepper                                             
1 C celery                                                                  
1 clove garlic, minced                                                 
1 (16 oz) can tomatoes, drained, liquid reserved         
1 1/2 C chicken stock
1 tsp thyme
1/4 tsp cayenne pepper
1/2 tsp black pepper
1 tsp salt
1 C rice
1 1/2 T worcestershire
2 lbs peeled, raw shrimp


In a very large pot, saute the sliced sausage and ham until browned on the edges. Remove the meat from the pot, but keep the dripping. Saute the onion, bell pepper, celery and garlic in the meat drippings until tender and the onions are translucent. Add tomatoes, thyme, pepper and salt, let cook for 5 minutes. Stir in the uncooked rice (not minute rice). Add the liquid from the tomatoes, stock and worcestershire sauce and bring to a boil. After coming to a boil, reduce to a simmer. Add the raw shrimp, ham and sausage and cook, uncovered for 30 minutes, stirring occasionally, until the rice and shrimp are done.

Cassi, Tatum and husband Mike in the background, on a swamp tour. Windy when you are speeding down the bayou.
Seeing an alligator made the entire trip for Cassidy, that and seeing her grandparents!

Tuesday, May 10, 2011

Puppy Birthday Party

Cassi is 7, oh my gosh. I cannot believe my little girl is growing up. We planned this birthday for 2 weeks, and it was great to be able to come up with so many "puppy" foods to serve.  We decided to have the party at the local ice skating rink, as if winter wasn't long enough, LOL! It was a great turnout, and we had a lot of fun. 

Condiments served in Dog Bowls; salsa for chips, ketchup for "dogs" in a blanket, and marinara for the "rawhide bones".
"Rawhide Bones", bread sticks served with marinara sauce.
Toasted tortillas cut to look like bones, "dogs" in a blanket.
We served mini hot "dogs" in a blanket, rawhide bones (bread sticks), puppy chow, bone tortillas I toasted to dip in hummus (my daughter's new favorite food), and a couple of other regular party foods.  We served the condiments in dog and kitty food bowls. I also made a dog cake, but it turned out to look a little like a teddy bear, but it tasted great anyway. Happy Birthday Cassi!!

I know, it looks more like a teddy bear than a Dog, but it tasted great!I should have changed the ears.

I used Kix Cereal to look more like dog food
Puppy Chow Recipe

Ingredients:
9 cups Kix cereal
1/2 C peanut butter
1/4 C butter
1 C chocolate chips
1/2 tsp vanilla
1 1/2 C powdered sugar

Instructions:
Combine the peanut butter, butter, and chocolate chips in a microwave safe bowl. Microwave for one minute. Take out of microwave and stir until all the ingredients are melted. If needed, microwave for 20 seconds more. Once melted, add vanilla and stir again until well blended.
Place the 9 cups of Kix cereal in a very large bowl.  Pour the melted mixture over the cereal and toss evenly, making sure all the cereal gets a good covering.
To coat with powdered sugar, I used two large ziplock bags. Placing ½ of the powdered sugar in each bag, I distributed ½ of the coated cereal in each bag. Once I made sure the bags were sealed, especially since my kids were doing this, the kids shook up the “puppy chow” until the cereal was well coated.
I like to use Crispix cereal, the original recipe calls for, as well as Cheerios, my personal favorite!


Cassi loves to ice skate, and this little "walker" helps her skate like a speed demon!
As far as activities for the kids, we played Dog, Dog, Cat (just like duck, duck, goose), and Trainer Says (like Simon Says). I also had some puppy and kitty coloring pages for the kids if they got tired of skating.

Monday, May 9, 2011

Sesame Cod

I love fish! Having been born in Alaska, fish was a huge part our diet. My family and I were spoiled, we ate salmon and halibut that was caught that day, and it is so healthy for you too. My son, Tatum, loves to fish, so I am always trying to come up with new ways to prepare it.We served an Asian salad, and I added broccoli at the last minute when we had some unexpected guests.  Just a little note, either halibut and tilliapia would also be good in this recipe.


Asian Sesame Crusted Cod   
 Ingredients:
1 1/2 lb Cod Fillet, cut into 4 equal pieces
2 Egg Whites, slightly beaten
1/2 cup Sesame Seed
1 Tbsp Butter
1/2 Lemon, cut into wedges
Salt to taste
Directions:
Season fillets with salt to taste. Dip the cod fillets in the egg whites.  Spread sesame seeds on plate and press each fillet  into sesame seeds to coat, turn over to coat the other side. Melt butter in large nonstick skillet over low heat, being careful not to brown butter. Place fillets in the pan and cook until golden, about 3 minutes. Turn each cod fillet and cook until fish flakes easily, 4 to 5 minutes. Do not overcook or the cod will be dry. Garnish with lemon wedge.

Saturday, May 7, 2011

“I Love You Mom” Pancakes

My kids are so dang sweet. I absolutely love breakfast foods, eggs benedict, bacon, waffles, just about anything, and for any time of the day. Tatum and Cassi made these wonderful pancakes for my mother's day breakfast. Thanks so much you guys, I am the luckiest mommy in the world!

Ingredients
1 ½ C flour
2 ½ tsp baking powder
¾ tsp salt
1 beaten egg
1 C milk
3 TBS vegetable oil
1 tsp vanilla
Red sprinkles, typically used for ice cream toppings
Directions
Turn the stove onto medium high or the griddle onto 350°.
Mix flour, salt and baking powder until it’s well combined.
In a separate bowl, combine the beaten egg, milk, and vegetable oil, careful not to over-beat the egg.
Add the wet mixture to the dry mixture, slowly pouring it over top of the dry ingredients.  Don’t beat the mixture, only mix them slightly until they are combined.  Add sprinkles, as many, or few, as you would like.

Lightly grease the pan or griddle with vegetable oil, we like to use the griddle because we can cook more pancakes at a time. In this case, we only have two heart molds, so we used a pan instead.
Using a spoon or a measuring cup, pour the batter onto the griddle (or into a greased mold). I let my kids use a ½ measuring cup. Smaller pancakes are easier for kids to flip. If using a mold, only fill halfway up the mold, you don't want to fill them or they will flow over the edges while cooking.
Wait for about 2 to 4 minutes. Once the pancakes start to bubble throughout the pancake, use a spatula to carefully flip them over. They should be golden brown. Continue to bake them on the griddle for 2 to 3 minutes, and remove from the griddle.
We enjoy our pancakes with butter and syrup, yummy. Thanks to my husband for helping the kids make these wonderful pancakes for me!

Thursday, May 5, 2011

Happy Cinco De Mayo!! Chili Rellanos

Okay, these really are the easiest things to make. There is very little prep work, and I think it only took us 10 minutes to make this entire meal. The kids love these "Chile rellanos", and we make mozzarella sticks out of the rest of the ingredients. Instead of margaritas to celebrate, we made homemade lemonade. Happy Cinco De Mayo everyone.

Ingredients

1 package of egg roll wraps
1 27 oz can WHOLE chilies, mild or heat of choice
16 string cheese sticks
Cream Cheese, if desired
Oil to cover egg rolls, about 4 inches deep in pan


Heat oil in pan, to about 375 degrees. Wash and make sure all seeds are removed from chilies, drain. Split the Chile down the side so it opens up into a triangle. Put one stick of string cheese in the middle of the Chile. I like to add a small amount of cream cheese as well, my dad likes just cream cheese, to each their own. Place the Chile on the egg roll wrap and roll up from and angle, see the picture. My kids love to help roll up the chilies, they are really good at it now, and it is a great way to get them involved in the cooking. Have some water handy to seal the egg roll to itself.


Put into the hot oil, make sure that an adult does this, as oil is hot and can splatter! After 2 minutes, turn and fry 1 minute more. Drain on paper towels.  We make plenty of these, and then use the rest of the string cheese to make mozzarella sticks, just roll up the string cheese the same way, without the chili. Dip in salsa, sour cream, guacamole, or marinara sauce.


Homemade Lemonade

Ingredients
1 C sugar, for simple syrup
1 C water, for simple syrup
1 C freshly squeezed lemon juice, 4-6 lemons
3-4 C cold water


Make the simple syrup by heating the sugar and water until the sugar is dissolved.  Juice the lemons to make one cup lemon juice. Add the juice and simple syrup to the cold water, cool for an hour in the refrigerator before serving. I like my lemonade to be a little less sweet, so I add more water to taste. Cut up extra lemons to add to the pitcher.

Wednesday, May 4, 2011

Tempura Green Beans

I love green beans, in fact I hope to have some growing in out garden this summer. My kids are not big fans of veggies, so I have to be creative when serving them in our house. Using a dipping sauce also helps my kids to eat their veggies. While ketchup and ranch dressing are okay, this dipping sauce will add depth to the tempura green beans (see dipping sauce recipe below). Watch your kids eat them up! Try other veggies as well, but green beans are our favorite.

Ingredients

1 C Flour
1 12 oz Beer, or 1 C cold Club Soda
1/4 C Sesame Seeds
Enough oil to cover 2 inches of bottom of pan
3/4 lb Green Beans, rinsed and trimmed
Salt and Pepper to taste


Heat oil in a pan, or use a fryer, to about 375 degrees. Combine flour, beer, and sesame seeds in a bowl, mix well. Put small batches of green beans in the mixture, make sure they are all coated.

When oil is hot, add the small batches of green beans. This is probably not a job for young children. Because this cooks at such a high temperature, there can be some splattering of oil. Cook for approximately 1-2 minutes. Put on paper towels to drain. Season with salt and pepper to taste.  Many of you may be concerned about the kids having beer in this recipe. Because this cooks at such a high temperature, the alcohol burns off. If you do not want to use the beer, use club soda.

Dipping sauce

2 TB Lime Juice
3 TB Soy Sauce
1 tsp Sugar

Combine all ingredients and use as a dipping sauce for tempura veggies

Monday, May 2, 2011

Fried Corn, MMMMMM, Yummy!

Corn and fried, two of my favorite things!

Cassi, my 7 year old, lost her 2 front teeth over the last week, and we are having a hard time trying to find foods that she can “take a bite out of,” ha ha. We love corn on the cob, and wanted to grill them, but being a typical Colorado spring, it was 30 degrees and snowing. So, we decided to make the corn a little bit easier for Cassi to eat by taking it off the cob. This recipe is so easy, and yummy as well. If your kids don’t like corn, give this one a try, they will love it. We served this with Lipton Onion burgers, check out the hamburger recipe at www.recipesecrets.com


Fried Corn
4 Corn on the Cob
2 TBS margarine
1TB Bacon Grease (worth it)
Salt and Pepper
½ C water
Shuck the corn and remove all silks, giving the kids a stiff brush will get them involved in this recipe.
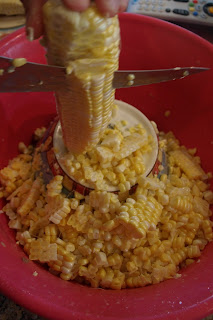
Using a large bowl with a smaller bowl inverted upside down inside of the larger bowl with help you to cut the kernels off of the cob. I’ve also heard of using an angel food pan will help to catch all of the kernels in the bottom of the pan, I will used this idea in the future! Try to scrape the cob clean with the back of the knife, we don’t want to waste any of the corn’s sweet kernels.  My son Tatum helped me do this, but may not be appropriate for younger kids.
Put the margarine and bacon grease in a pan over medium heat, add the corn and corn pulp. Season the corn to taste, about ½ tsp of each. I try to limit salt in our family, so I add it now and not later so I can control how much salt my family gets. Add ½ cup of water. Bring the mixture to a boil and then reduce the heat to simmer for about 30 minutes. I usually can’t wait, as the sweet smell gets my taste buds going crazy.
Cassi and her two missing front teeth. The tooth Fairy is going broke!!

Saturday, April 30, 2011

Spam Musubi Sushi

Okay, I know, Spam right?! I swear this is one of our families favorite foods. Musubi is a very popular form of Sushi from Hawaii, and my friend Mikeli taught me how to make it. It is easy, super economical, and my kids love it. This dish is a great way to introduce your kids to sushi, and they will have a blast making it. BTW, it is pronounced moo-soo-bee.


Ingredients

1 can of Spam, cut lengthwise into 8-10 slices
6 C prepared Calrose Rice, or of sushi rice
4-5 sheets of Sushi Nori (roasted seaweed), cut in 1/2
Ponzu and/or Soy Sauce

Teriyaki Sauce
1/2 C soy Sauce
1/2 C Mirin (sweet rice vinegar)
1/2 C Sugar

Cut the spam lengthwise into 8-10 slices, depending on the thickness. Fry the spam for 2 minutes or so, until brown and slightly crispy on the outside. Remove from the heat and drain on paper towels.

For teriyaki sauce, combine soy sauce, mirin, and sugar and mix well. Bring to a boil in saucepan, reduce to a simmer for a couple of minutes. Pour into a shallow dish and let the spam slices marinate for 5 minutes.

Now, prepare to roll the spam musubi! The kids will love to help with this. If you have a Spam Press, it goes quicker, but a set of hands does the trick as well, just use the Spam can as the mold. Have a small glass of water handy to seal the Nori once rolled.

In the middle of the Nori, use 1/4 c of rice and mold with Spam Press or the Spam can, pressed it should be about 1/4 of an inch thick. Place a slice of the marinated spam on top of the pressed rice. Cover with an additional 1/4 c rice and press again.

Fold one side of the nori over the top of the spam and rice "sandwich", and press lightly. Slightly wet the other end of the nori and fold on top of the other piece to seal.

They are now ready to eat, yummy!!! We dip the Musubi into leftover teriyaki sauce or soy, or ponzu, sauce.

Thursday, April 28, 2011

Yummy Blackberry Muffins

Tatum putting the muffins in the oven, can't wait to lick the bowl!!